GARDEN ENDEAVORS
![]()
PREDATORS
THE BIRD
WARS...... We all love animals. That is a common attribute of "Pond"
people. However, when the wildlife we have attracted to our backyards begin
killing and eating our relatively expensive pet fish, we are faced with the
necessity of discouraging their visits. Such is the case of the Great Blue
Heron. This wading, migratory bird, whose wingspan can approach six feet, is a
virtual Koi killing machine. Fish too large to be eaten are speared, and left
to die, much like the way a weasel will kill every roosting hen in a chicken
house. In addition, the heron's fecal matter contains a myriad of pathogens
that are likely to show up as disease in any fish that remain. If a heron finds
your unprotected pool, your fish are as good as gone. Even with the best known
methods, understand that heron are quite adaptable, and still may eat your
fish. Here are some strategies that may help you win the Bird Wars:
1.
Use an anti-heron
pool design. Do not build your pool with any shelves , shallow areas, beaches,
etc. Instead, uses steep walls down to at least 36 inches to discourage herons
from standing in the water. Be forewarned, however, that such design could
sacrifice safety should a young or old person fall into the pool.
2.
Use barriers:
1.
To discourage
herons from wading into your pool, string a heavy monofilament all around the
pool at a height of fourteen inches.
2.
Cover the pool
with bird netting. Raise the netting so that it is at least 20 to 25 inches
above the water level. Netting the pool is especially called for in the fall
and early spring when surface coverage of plants is at a minimum.
3.
Place items in
the pool that your fish can hide under.
4.
Enlist a natural
enemy. Get a dog that hates herons.
5.
Use Decoys.
Obtain a lifelike statue of a heron and place it at the pool. Move it often.
Heron are solitary hunters and dislike company.
6.
Build and use the
"Heronizer" While the bird netting barrier is probably the most
effective heron deterrent, the use of motion detectors to operate startle
equipment can help. Motion sensors can be used to operate sprinklers, noise
makers such as bells or radios, or create movement to scare away predatory
intruders. My version of the motion sensing heron startle system is the
"HERONIZER."
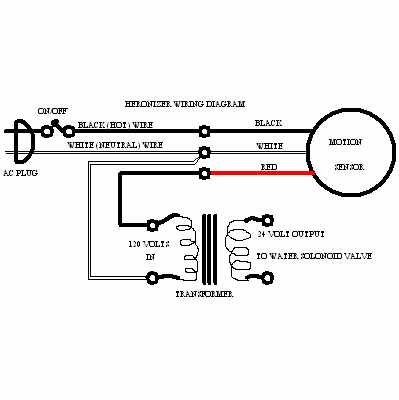
The HERONIZER consists of a motion detector
from a common security light and several low voltage startle options. Here is
the parts listing for the basic HERONIZER:
Security
light, Regent model MS35 $10.84
Adapter 1/2
PVC to 1/2 pipe (2) at .19 $.38 P>Ell 90 degree 1/2"PVC (2) at .15 $.30
1/2 PVC PIPE
10' $.86
Riser, black
poly 1/2" x 8" $.44
Ceiling box,
non metallic B620H $2.13
Transformer,
(Doorbell) 24 volt Trine #125C $10.68
Hose washers
$0.98
Coupling,
brass, male hose to male 3/4 pipe. $1.83
Coupling,
brass, female hose to male 3/4 pipe. $1.96
Rainbird
pulsating waters sprinkler with metal spike #SK-5 $5.86
Rainbird water
valve #CP075 3/4 auto inline $9.97
Wire nuts
(four) $0.60
Power cord,
'14 -2 type UF electric wire, 10 feet. $1.45
Electric plug,
male (Lowes 72590) $1.63
Miscellaneous
screws, etc. $0.50
Silicon caulk,
GE $3.96
Thermostat
wire, 2 conductor, 20 feet $1.80
TOTAL $50.41
INSTRUCTIONS
FOR CONSTRUCTING THE HERONIZER
The basic
HERONIZER consists of a motion sensing device and an electrically operated
water sprinkler. The HERONIZER can be used to operate more than a water
sprinkler, however. It can operate any accessory using 12 or 24 volts AC, such
as a bell, buzzer, or with rectification, small DC motors to produce movement
to disturb predators.
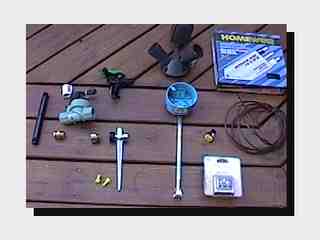
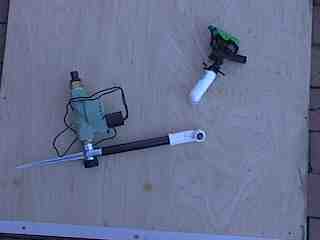
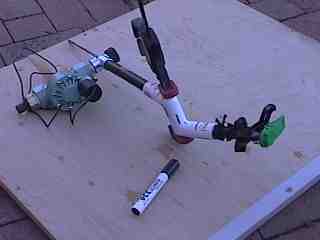
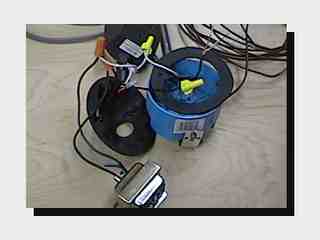
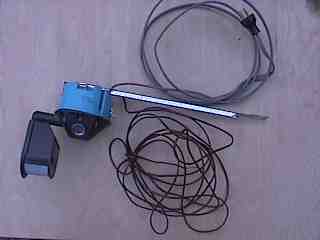
Here is a photo of the main parts.
Begin by assembling the water valve/sprinkler
component.
The water
valve/sprinkler assembly is fairly straightforward and should not present any
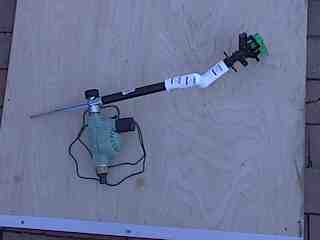
problems. The completed assembly appears as depicted in this following photo.
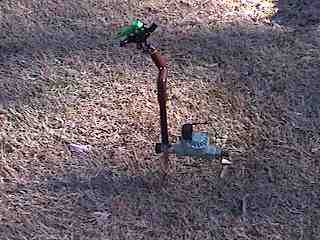
The completed sprinkler/valve assembly
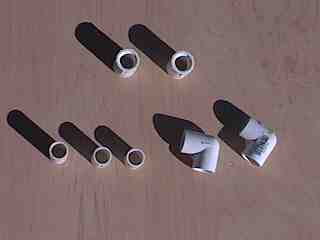
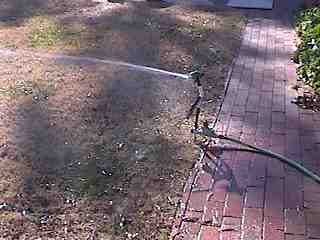
The trickiest part of the sprinkler/valve assembly is
adjusting the sprinkler to send a level stream straight out across your pond,
rather than up in the air as is it's ordinary function. This is accomplished by
using the following parts: Two 90 degree 1/2 PVC ells, two 1/2 female pipe to
1/2 PVC adapters, and three 1 inch pieces of 1/2 PVC pipe and some PVC cement.
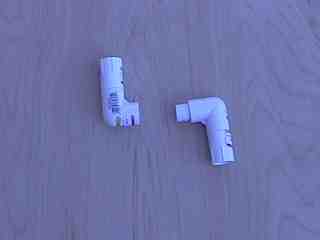
The parts look like this:
First, glue the parts as shown here:
Then assemble as shown. DO NOT glue the final
connection.
Fit
the two parts together.
Attach a clamp as shown so parts will not come apart
when pressurized by water.
Attach hose and using the manual switch on the water
valve, operate the sprinkler.
Adjust
the unglued connection to vary the water nozzle angle. Remove from water and
using a magic marker place a mark on the parts for alignment after glueing.
Remove the clamp. Apply PVC cement and glue the pieces
together taking care to position the alignment marks.
Paint the white PVC a dark brown.
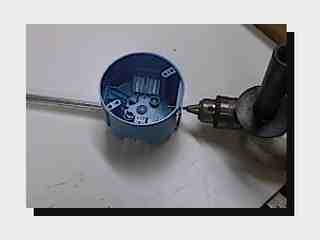
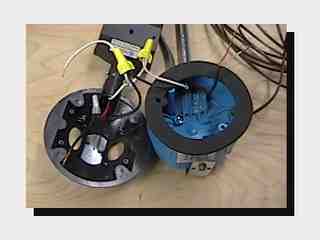
The sensor assembly is a little bit more complex.
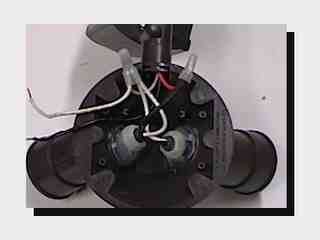
This is what the unaltered sensor wiring will look
like.
First, cut the wiring as shown.
Pre-drill for a tap screw.
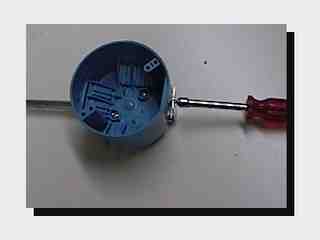
Install a small tap screw.
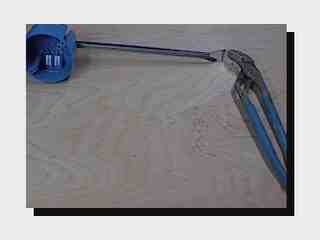
Flatten the bracket so it can be pushed into the
ground.
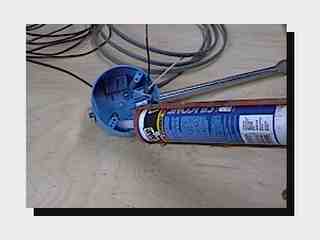
Seal the box with silicone caulk.
Wire the AC
power cord. The black wire from the cord should attach to the single black
loose wire coming out of the sensor. Attach the white wires together. If you
desire an ON/OFF switch, wire it into the black wire coming from the power
cord. I suggest that you arrange a remote switch so that you can turn on and
off the HERONIZER a safe distance away. Addition of a pilot light, either at
the remote switch location or on the unit itself is helpful both to warn you of
the system being armed but also to give you peace of mind at a glance that your
system is on.
Attach the
transformer black wires, one to the other white wires and the other to the
black wire coming out of the sensor that originally went to the floodlight
sockets.
Assemble the transformer into the plastic ceiling box.
Remove the
plastic nuts from the floodlight holders and remove them from the sensor. Place
1/2" plugs in the resulting holes. You may have to crimp the springs on
the plugs to obtain a tight fit.
Attach the
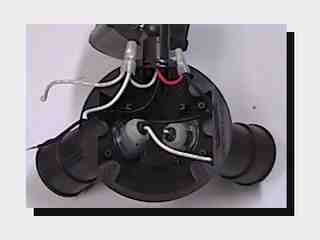
thermostat wire to the transformer, selecting either 12 or 24 volts AC.
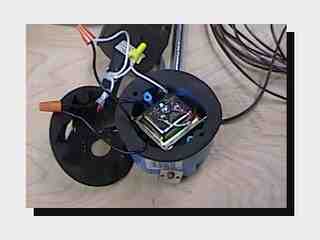
This is what
the completed sensor looks like. The blue plastic box and bracket should be
painted dark brown.
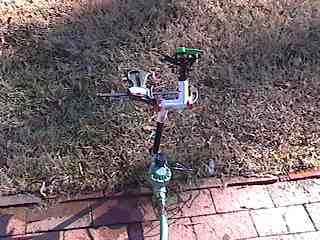
If you've
gotten this far, you will have a versatile motion detection device that can
actuate a number of different apparatus to help in dissuading predators, most
specifically, the Great Blue Heron. Because of the module style construction,
you can even operate a tape recorder or motorized scaring device with the
sensor, by incorporating a 12 volt AC relay.
To operate the
sensor, place the function switch on "test". Other settings will
cause the detector not to operate during daylight. This will provide a 4 second
operation each time movement is detected. Turn the sensitivity up as high as
you can without spurious signals, and avoid aiming at waterfalls.
One caution:
Not all security lights (even the same model number) act exactly the same when first
turned on. Many will activate immediately when turned on and then shut down in
ready mode to start up again when energized by motion detection. Others may not
do anything when turned on, but still be active for motion detection. I say
this in order to help you avoid getting wet!
You may notice
an increase in performance if you remove the snap on deflector on the top of
the sprinkler.
If you decide
to build the HERONIZER please let me know how it works out for you. I am
building four of them at about the same cost as one commercially produced
motion detector/sprinkler device.
Note: In operation, if the power goes off and immediately back on, your
heronizer will spray water constantly until turned off. Wait 4 seconds before
turning back on and the cycle will self adjust.